How To: Monitor APC Smart-UPS 1500
Step-by-step guide to monitoring an APC Smart-UPS 1500 using a Raspberry Pi and Network UPS Tools (NUT). Includes hardware setup, Modbus configuration, and compiling NUT from source.

Introduction
So I recently picked up a used APC Smart-UPS 1500I (with an apparently new battery) to protect my NAS and other Servers at home from power outages, and I wanted a way to monitor the power load in the event of an outage. The obvious go-to was NUT aka Network UPS Tools, which lists my UPS as a supported model. I also wanted the monitoring to be standalone and not reliant on existing hardware, so I opted to use a spare Raspberry Pi 3 model B v1.2 I had sitting around.
Configuring the Raspberry Pi
For the operating system I opted to use Raspberry Pi OS Lite (64-bit), this is a trimmed down operating system (without a desktop interface) based on Debian Bookworm. I flashed it to a 64 GB microSD card using the official Raspberry Pi Imager. Once booted up first thing to do is to update the OS with the latest patches:
1
2
sudo apt update
sudo apt upgrade -y
The Raspberry Pi is connected to the UPS via USB (USB A to USB B cable). The apt package version of NUT typically includes generic drivers which miss detailed metrics like load; compiling NUT with apc_modbus exposes those.
We can confirm the Pi can see the UPS:
1
2
3
4
5
admin@geekhome:~ $ lsusb
Bus 001 Device 004: ID 051d:0003 American Power Conversion UPS
Bus 001 Device 003: ID 0424:ec00 Microchip Technology, Inc. (formerly SMSC) SMSC9512/9514 Fast Ethernet Adapter
Bus 001 Device 002: ID 0424:9514 Microchip Technology, Inc. (formerly SMSC) SMC9514 Hub
Bus 001 Device 001: ID 1d6b:0002 Linux Foundation 2.0 root hub
An optional step is disabling USB autosuspend (this can help some APC units stay responsive):
1
sudo sed -i '1 s/$/ usbcore.autosuspend=-1/' /boot/firmware/cmdline.txt
A reboot is required to apply the setting.
Configuring the UPS
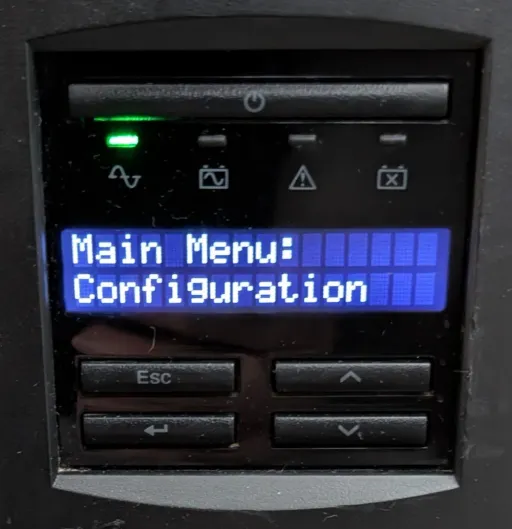
You need to enable Modbus on the actual UPS itself by going into the main menu and selecting Configuration
and scrolling through until you get to Modbus and set it to Enabled.
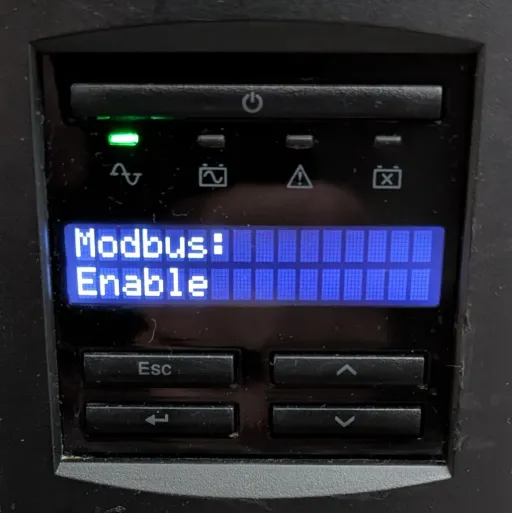
This enables the Modbus protocol over USB.
Compiling NUT
To start with we install the required dependencies:
1
sudo apt install autoconf automake build-essential git libtool libusb-1.0-0-dev pkg-config
Next we need to download and compile a modified version of libmodbus:
1
2
3
4
5
6
git clone -b rtu_usb https://github.com/networkupstools/libmodbus.git
cd libmodbus/
./autogen.sh
./configure --with-libusb --prefix=/usr/local/libmodbus-rtu_usb
make -j$(nproc)
sudo make install
Next we ensure the dynamic linker includes this when searching for shared libraries:
1
2
echo "/usr/local/libmodbus-rtu_usb/lib" | sudo tee /etc/ld.so.conf.d/libmodbus-rtu_usb.conf
sudo ldconfig
Next we validate that the libraries are setup correctly:
1
2
3
export PKG_CONFIG_PATH=/usr/local/libmodbus-rtu_usb/lib/pkgconfig:$PKG_CONFIG_PATH
pkg-config --modversion libmodbus       # Should print: 3.1.6
pkg-config --cflags --libs libmodbus    # Should print: -I/usr/include/modbus -lmodbus
We can make our PKG_CONFIG_PATH persistent across reboots with:
1
2
echo 'export PKG_CONFIG_PATH=/usr/local/libmodbus-rtu_usb/lib/pkgconfig:$PKG_CONFIG_PATH' | \
  sudo tee /etc/profile.d/libmodbus_rtu_usb.sh >/dev/null
Next we download and compile NUT, for this I grab the latest release (2.8.4 at the time of writing):
1
2
3
4
5
6
7
8
9
10
11
12
13
14
15
cd ~
git clone https://github.com/networkupstools/nut.git
cd nut
git checkout v2.8.4
./autogen.sh
PKG_CONFIG_PATH=/usr/local/libmodbus-rtu_usb/lib/pkgconfig \
./configure --with-usb \
            --with-modbus+usb \
            --with-drivers=apc_modbus \
            --with-user=nut \
            --with-group=nut \
            --with-drvpath=/usr/local/ups/sbin \
            --prefix=/usr/local/ups
make -j$(nproc)
sudo make install
Once compiled, we can confirm we can see the UPS using NUT:
1
2
3
4
5
6
7
8
9
10
11
12
13
admin@geekhome:~/nut $ sudo /usr/local/ups/bin/nut-scanner -U
Scanning USB bus.
[nutdev-usb1]
        driver = "usbhid-ups"   # alternately: apc_modbus
        port = "auto"
        vendorid = "051D"
        productid = "0003"
        product = "Smart-UPS 1500 FW:UPS 15.0 / ID=18"
        serial = "AS1404224998"
        vendor = "American Power Conversion"
        # bus = "001"
        # device = "004"
        # busport = "005"
Configuring NUT
We start by configuring the UPS:
1
sudo nano /usr/local/ups/etc/ups.conf
1
2
3
4
5
6
7
8
9
10
11
12
# Where upsdrvctl will look for driver binaries
driverpath = /usr/local/ups/sbin

# MUST match what upsd expects; keep driver+server aligned
statepath  = /var/state/ups

[apc-1500]
  driver   = apc_modbus
  porttype = usb
  port     = auto
  vendorid = 051d
  desc     = "APC via Modbus/USB"
Next we configure which UPS to monitor:
1
sudo nano /usr/local/ups/etc/upsmon.conf
1
MONITOR apc-1500@localhost 1 monuser a-strong-password master
apc-1500 corresponds to the name you gave the UPS in ups.conf
Next we configure the network interface we want NUT to listen on:
1
sudo nano /usr/local/ups/etc/upsd.conf
1
LISTEN 0.0.0.0 3493
This configuration listens on all network interfaces.
Next we configure which mode we want NUT to operate under:
1
sudo nano /usr/local/ups/etc/nut.conf
1
MODE=netserver
I am using netserver as I want other devices to react based on the state of NUT.
Next create a NUT user account:
1
sudo nano /usr/local/ups/etc/upsd.users
1
2
3
[monuser]
  password = a-strong-password
  admin master
Use a stronger password than
a-strong-password!
Next we create the service account for NUT to use:
1
2
3
4
getent group nut || sudo groupadd --system nut
getent passwd nut || sudo useradd --system --home /var/lib/nut --no-create-home \
        --shell /usr/sbin/nologin --gid nut nut
sudo usermod -g nut nut
Create /var/state and the ups subdir with correct owner/perms:
1
2
sudo mkdir -p /var/state
sudo install -d -o nut -g nut -m 0770 /var/state/ups
Next we fix world-readable users file:
1
2
3
4
sudo chown root:nut /usr/local/ups/etc/upsd.users
sudo chmod 640      /usr/local/ups/etc/upsd.users
sudo chown root:nut /usr/local/ups/etc/upsd.conf
sudo chmod 640      /usr/local/ups/etc/upsd.conf
Create the NUT Service to ensure it starts on boot:
1
sudo nano /etc/systemd/system/nut-driver.service
1
2
3
4
5
6
7
8
9
10
11
12
13
14
[Unit]
Description=Network UPS Tools - Drivers
After=network-online.target
Wants=network-online.target

[Service]
Type=forking
ExecStart=/usr/local/ups/sbin/upsdrvctl start
ExecStop=/usr/local/ups/sbin/upsdrvctl stop
# If you ever rename the UPS in ups.conf, update this PID path accordingly:
PIDFile=/var/state/ups/apc_modbus-apc-1500.pid

[Install]
WantedBy=multi-user.target
Enable the NUT services:
1
2
3
4
sudo systemctl daemon-reload
sudo systemctl enable --now nut-driver
sudo systemctl enable --now nut-server
sudo systemctl enable --now nut.target
Now reboot. We can confirm the services are up and running and then test connecting to the UPS:
1
2
3
systemctl status nut-driver --no-pager
systemctl status nut-server --no-pager
/usr/local/ups/bin/upsc apc-1500@localhost
You should now have a running instance of NUT reporting all the correct information for your UPS:
1
2
3
4
5
6
7
8
9
10
11
12
13
14
15
16
17
18
19
20
21
22
23
24
25
26
27
28
29
30
31
32
33
34
35
36
37
38
39
40
41
42
43
44
45
46
47
48
49
50
51
52
53
54
55
56
57
58
59
60
61
62
63
64
65
66
67
68
battery.charge: 100.00
battery.date: 2025-07-15
battery.date.maintenance: 2030-01-07
battery.runtime: 7740
battery.temperature: 30.59
battery.voltage: 27.00
device.mfr: American Power Conversion
device.model: Smart-UPS 1500
device.serial: AS1404224998
device.type: ups
driver.debug: 0
driver.flag.allow_killpower: 0
driver.name: apc_modbus
driver.parameter.pollinterval: 2
driver.parameter.port: auto
driver.parameter.synchronous: auto
driver.state: quiet
driver.version: 2.8.4
driver.version.internal: 0.12
driver.version.usb: libusb-1.0.26 (API: 0x01000109)
experimental.output.energy: 504299
experimental.ups.mode.buzzwords: vendor:apc:HE
input.transfer.high: 253
input.transfer.low: 207
input.transfer.reason: AcceptableInput
input.voltage: 239.00
outlet.group.0.delay.reboot: 8
outlet.group.0.delay.shutdown: 0
outlet.group.0.delay.start: 0
outlet.group.0.name: UPS Outlets
outlet.group.1.delay.reboot: 8
outlet.group.1.delay.shutdown: 360
outlet.group.1.delay.start: 0
outlet.group.1.name: Outlet Group 1
outlet.group.2.delay.reboot: -1
outlet.group.2.delay.shutdown: -1
outlet.group.2.delay.start: -1
outlet.group.2.name:
outlet.group.3.delay.reboot: -1
outlet.group.3.delay.shutdown: -1
outlet.group.3.delay.start: -1
outlet.group.3.name:
outlet.group.count: 2
output.current: 0.66
output.frequency: 49.94
output.voltage: 239.00
ups.delay.reboot: 8
ups.delay.shutdown: 0
ups.delay.start: 0
ups.efficiency: LoadTooLow
ups.firmware: UPS 15.0
ups.id: APCUPS
ups.load: 7.80
ups.mfr: American Power Conversion
ups.mfr.date: 2014-01-23
ups.model: Smart-UPS 1500
ups.power: 155.86
ups.power.nominal: 1500
ups.productid: 0003
ups.realpower: 77.97
ups.realpower.nominal: 1000
ups.serial: AS1404224998
ups.status: OL
ups.test.result: Passed, Source: Internal
ups.timer.reboot: -1
ups.timer.shutdown: -1
ups.timer.start: -1
ups.vendorid: 051d